Boot Device Reimage
Problem:
Give back fails or filer does not completely come online.
Possible Cause:
Corrupt boot drive
Resolution:
Software Prerequisites:
- Filezilla Server
- NetApp Netboot Image
- NGINX http server utility
- Solarwinds TFTP Client
- Download Filezilla Server for Windows and install onto laptop
FileZilla - [[../All Company/Configure FileZilla Server|Configure FileZilla Server]]Create admin user with password and set desired home directory with read/write permissions
- Disable Windows firewall for Public and Private connections
- Open Putty and connect serial cable to healthy filer console serial (IOIO) port
- Login using cluster admin account (password provided by customer)
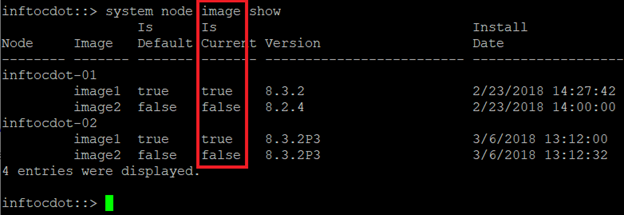
- Determine the current image on the cluster
system node image show
In the below example the current image for node inftocdot-01 is 8.3.2
- Check the system for the correct package in the mroot directory
system node image package show
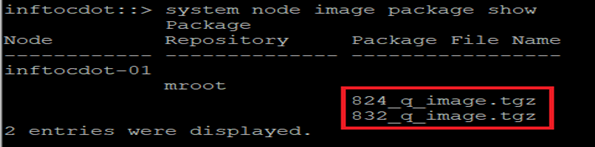
8. Determine both node’s management Ethernet port (e0M) IP Addresses
network interface show
- Connect a cable to the black wrench management port of the healthy node (same one you are connected to via serial) to your laptop and set your laptop IP address to one in the same range as the management port.
- With Filezilla Server running and the Windows firewall disabled, we need to download the image file from the mroot of the healthy filer to the Home folder previously configured in Filezilla Server. This image file will be used to re-image the boot device for the down node.
- Download the image from the healthy filer to your laptop
system script upload -filename /mroot/etc/software/<image>.tgz -destination ftp://<laptop_ip_address>/<image>.tgz
User name and password is what was set when configuring FileZilla server
- Determine if the cluster is in a switched or switchless environment
set -privilege advanced
network options switchless-cluster show
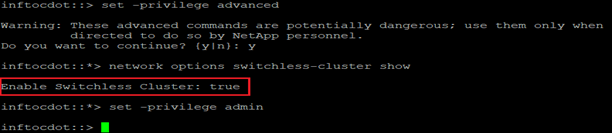
set -privilege admin
- Once the file has been uploaded to your laptop, move your Ethernet cable to the down node’s wrench (e0M) Ethernet management port and also move the serial cable to the down node’s IOIO console serial port
- Open a serial Putty session and you should be at the LOADER> prompt
- Set the boot mode to clustered mode
setenv bootarg.init.boot_clustered true
- Set the IP Address of the management interface (e0M)
ifconfig e0M -addr=<ip address> -mask=<subnet mask> -gw=<gateway> -dns=<DNS>
Use information attained from the customer for this filer
- On your laptop, extract the netboot.tgz image
- Extract the nginx image
- Place the netboot extracted folder and the Ontap image into the html directory of nginx directory
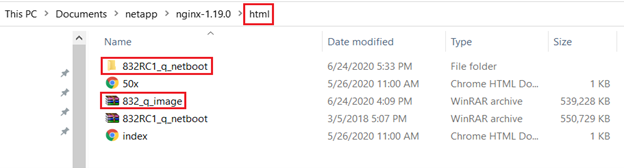
- Open a Command Window and navigate to the directory where the nginx folder is located
- Run the nginx.exe
- Perform a netboot from the LOADER> prompt
netboot http://<IP Address of laptop>/<netboot file>/netboot/kernel
If HTTP is not working properly, you can install Solarwinds TFTP client onto the laptop and use TFTP instead of HTTP to perform the netboot. Copy the netboot file folder into the C:\tftp_root directory. Close the nginx command window and open the TFTP client software.
You would use the following command:
netboot tftp://<IP Address of laptop>/<image>.tgz
-
At the menu, select option # 7 “Install new software first”
If prompted, answer “Y” to the prompt to replace the existing data ontap software
-
Enter the URL for the image
http://<IP Address of laptop>/>image>.tgz
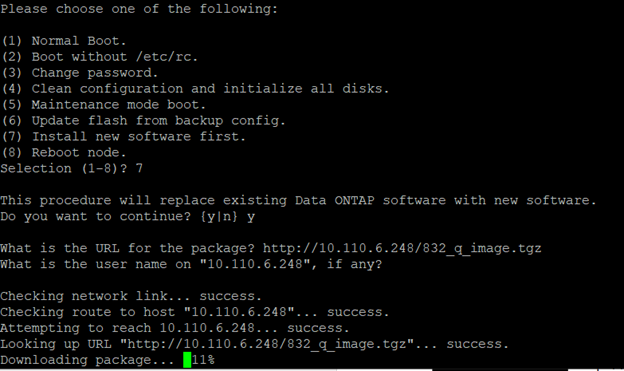
- Once the software is installed, it will prompt to restore the backup configuration. Answer “Y"
- Answer “Y” to any prompts concerning the restore of the backup
- The backup configuration needs to be restored from the healthy partner node. Reconnect the customer’s management Ethernet cable into the e0M wrench port. Move the console serial cable to the healthy partner node. Log into the cluster as admin and issue the following commands
set -privilege advanced
system node restore-backup -node <name_of_healthy node> -target-address <IP_Address_of_impaired_node>
set -privilege admin
- You should see a message that the varfs.tgz was successful
- Move the console serial cable back to the impaired node and answer the prompt that the restore backup procedure was successful. Enter “Y”
- The node will need to be rebooted. Answer “Y” to reboot now
- The node will reboot to “waiting for giveback”. Log into the cluster and perform the giveback
storage failover giveback -ofnode <name_of_down_node>
- The node may reboot due to updating the config files and come back to waiting for giveback again. Issue the giveback command from above
- Monitor the giveback using the serial connection to monitor the node coming back online. You can also monitor it thru the cluster prompt
storage failover giveback show
- Verify cluster status
cluster show
Reference Documentation - [[../Work/Documentation/Netapp/Boot Device Reimage.pdf|Boot Device Reimage]]